
Today, I’m excited to share How to make dulce de leche! This fast and easy method delivers a delicious homemade dulce de leche in only 15 minutes, and the best part is, it requires no pressure cooker, slow cooker, or any special equipment!
Love dulce de leche as much as I do?
👉 Don’t miss my Easy Churro Cake, layered with cinnamon sugar and dulce de leche.
👉 Cozy up with a slice of my Chocolate Spice Cake with dulce de leche—it’s rich, warm, and an absolute favorite during Christmas time.
👉 Or try my Dulce de Leche Crème Brûlée, with silky custard and a crackly caramelized sugar topping.
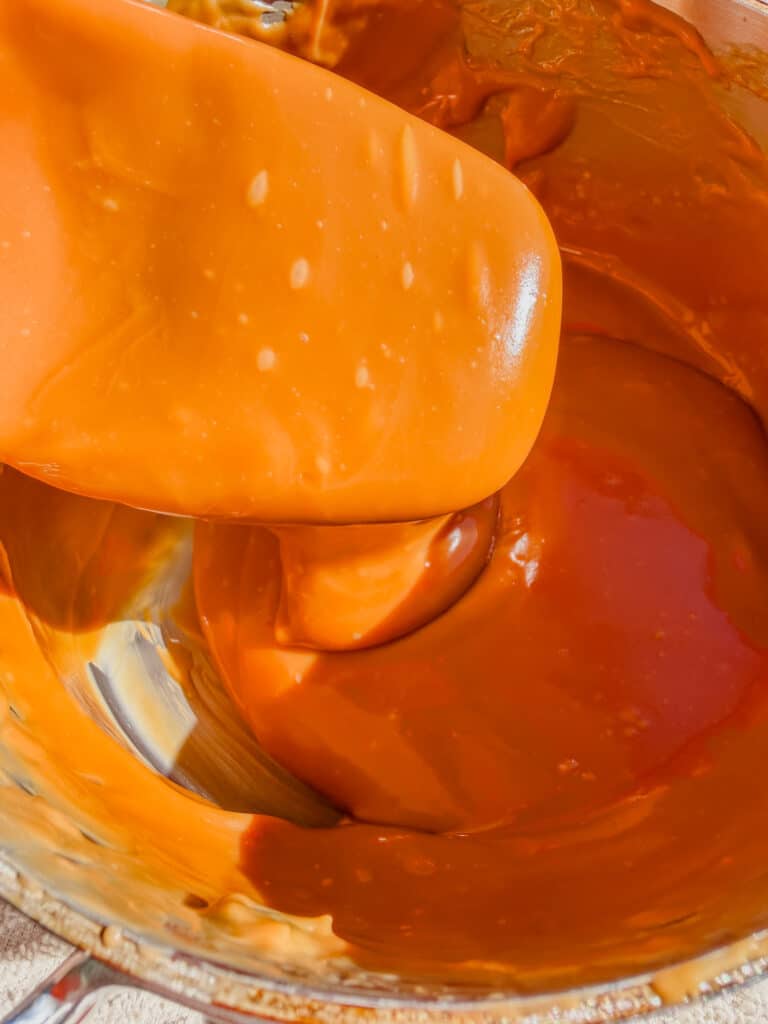
Table of Contents
Inspiration for this Recipe:
I live in a place where dulce de leche is a rare find at the local grocery store. This has led me on a quest for a quick and foolproof method.
Sure, there’s the traditional way my grandmother used to make it – cooking milk and sugar on the stovetop, stirring constantly for what felt like an eternity. The results were undoubtedly great, but who has the luxury of spending two hours straight in the kitchen these days? Certainly not most of us with full-time jobs, little kids, or both! Then there’s the option of boiling canned condensed milk for a couple of hours or resorting to a pressure cooker to speed up the process. While effective, these methods still require a substantial time investment.
Even if you manage to cut down the cooking time, you’re left with the agonizing wait for the cans to cool down before you can crack them open (otherwise they might splatter and burn you, so be careful!). Plus, I am not entirely convinced chemicals won’t leach into the dulce de leche….
Now, Imagine needing dulce de leche for a spontaneous cake craving, only to realize it involves hours of preparation and waiting. It’s a bummer, right? Life is too short for premeditated cake adventures! That is why the recipe I am about to share will change your dessert game forever. It is the best stovetop method for spur-of-the-moment dulce de leche, where indulgence meets impatience in the most delightful way possible!
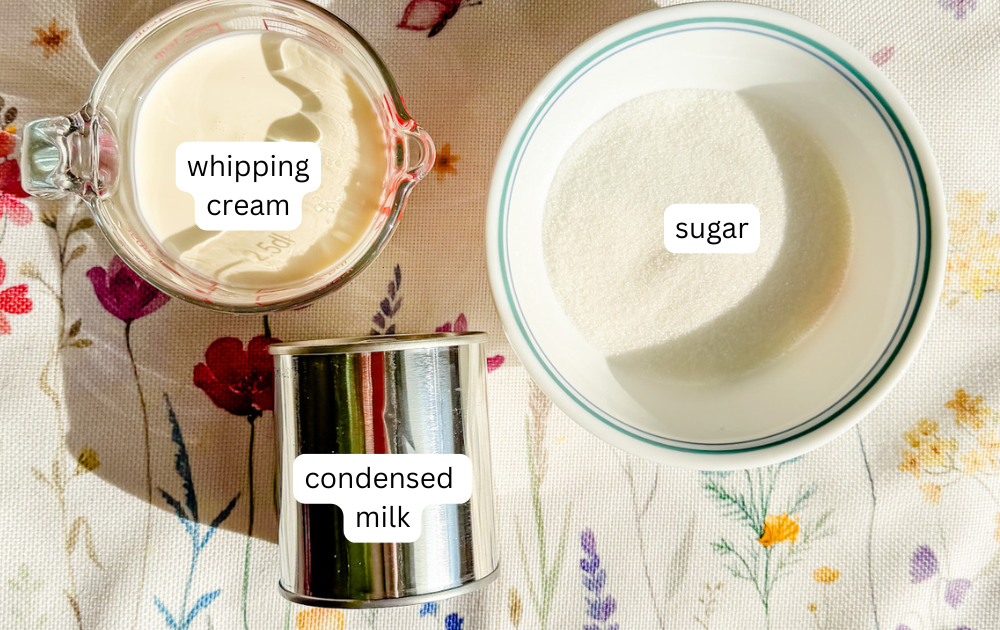
Ingredients:
- White sugar
- Condensed milk: Since this recipe requires only three simple ingredients, I highly recommend splurging on good-quality condensed milk. It will undoubtedly make a difference in your final result.
- Whipping cream
How To Make Dulce de Leche in 15 min
- Melt the sugar
Add the sugar to a medium saucepan over medium heat. Let it melt without stirring at first. Once it begins melting, stir gently until the sugar is fully dissolved and turns a light amber caramel color. - Add the cream
Slowly drizzle in the whipping cream while stirring continuously. The mixture will bubble and sizzle—this is normal. Continue stirring until the cream is fully incorporated. - Stir in the condensed milk
Gradually add the sweetened condensed milk while stirring constantly to keep the mixture smooth. - Cook until thick
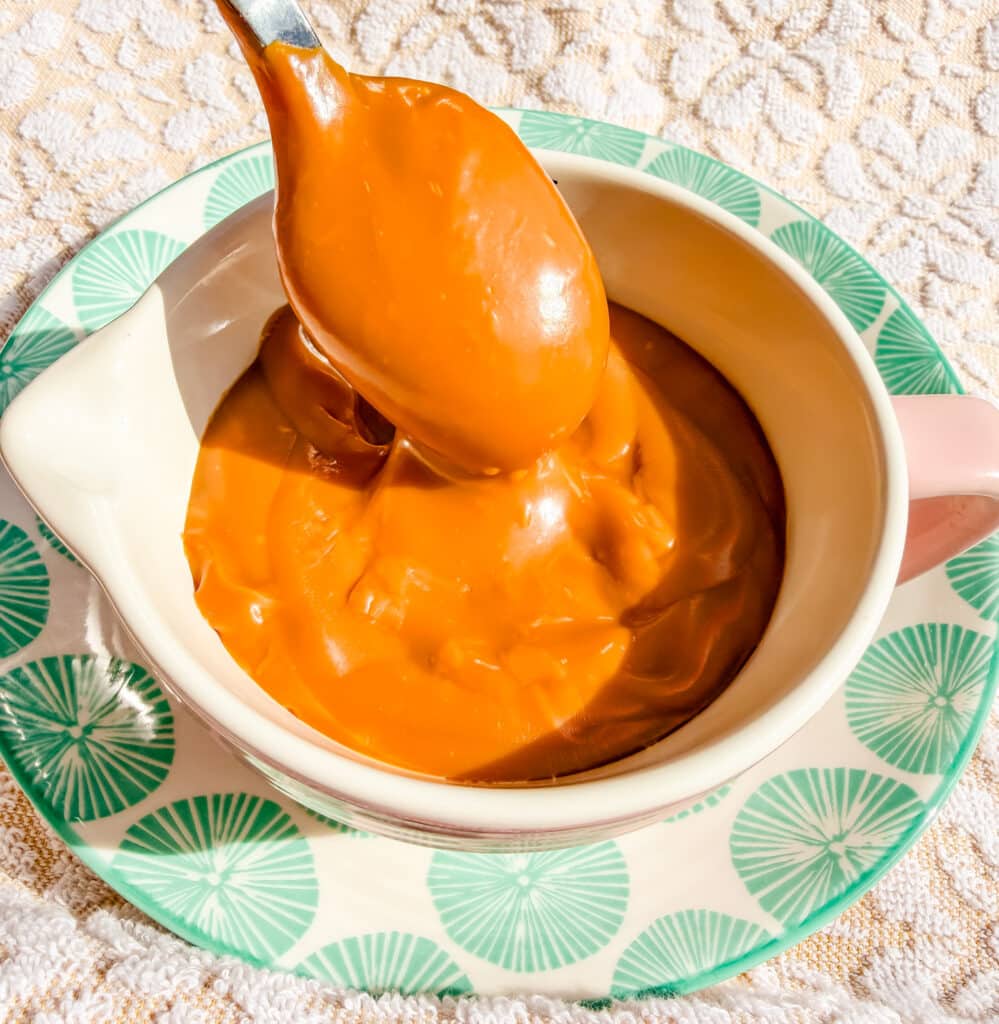
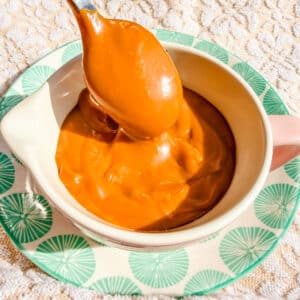
Keep stirring as the mixture bubbles and thickens. When you can drag a spoon across the bottom of the pot and the dulce de leche falls back in thick ribbons, it’s ready. - Cool
Transfer to a bowl and allow it to cool before using.
Pro Tips:
1: Once your sugar has melted and taken on a light amber tone, it’s crucial to move on to the next step. Even if you prefer a darker dulce de leche, resist the temptation to to make it very dark. The caramel will naturally darken as the recipe unfolds, and if it starts too dark, there’s a risk it may taste burnt by the end.
2: Warm the whipping cream slightly before adding it to the melted sugar. You can microwave it for about 10–15 seconds so it’s no longer cold. This helps prevent the caramel from seizing when the cream is added.
3: When adding the whipping cream, be patient and pour it in slowly. Rapid pouring can cause the caramel to cool too quickly, leading to hardening. In other words, instead of a smooth dulce de leche, you will have a bunch of little sugar rocks. Best results are achieved with a gradual and very slow pour.
4: Always remember, as it cools down, Dulce de Leche becomes more consistent. You’re not aiming for your ideal consistency on the stove; you’re trying to remove it before it gets there. Overcooking may result in dulce de leche without a creamy and spreadable texture, so it’s important not to overcook.
5. This recipe provides instructions for achieving a spreadable consistency for dulce de leche. However, you can easily tailor the cooking time to match your preferred consistency. Keep a watchful eye, as this is a rapid recipe where every minute counts! Adjusting the cooking time allows you to customize the texture of it to suit your taste perfectly.
Troubleshooting:
- Uh-oh, Too Dark Caramel: If your caramel took a detour to the dark side, it’s best to wave it goodbye and start fresh. No worries, happens to the best of us. Learn from it and nail that perfect amber shade on your next attempt.
- Hardened Caramel Hiccup: Did your caramel turn into a rock as you rushed with the whipping cream? If you’ve only poured a little of the whipping cream and noticed a few hardened pieces, don’t panic. Continue adding the rest of the whipping cream, but this time, take it slow. Once you’re done, scoop out any remaining hardened pieces that haven’t melted. However, if you’ve poured in a substantial amount of whipping cream and the caramel is beyond saving, it’s best to start fresh before wasting your condensed milk as well. Better to reset and get it just right!
How to Serve
Dulce de Leche can be enjoyed in different ways.
- On its own: Spoon it straight from the jar.
- With Cheese: Pair dulce de leche with your favorite cheeses for a sweet and savory combination. The creamy texture and sweet notes of the dulce de leche can complement a variety of cheeses, creating a sophisticated and indulgent cheese platter.
- Bread Spread: Transform your morning toast or afternoon snack by spreading dulce de leche on bread. The combination of the sweet caramel flavor with the simplicity of bread is a timeless and comforting treat.
- Desserts: Elevate your desserts by incorporating dulce de leche into cakes, pies, or other sweet creations. Use it as a filling, drizzle it on top, or swirl it into the batter for an extra layer of decadence.
- Ice Cream: Turn an ordinary scoop of vanilla ice cream into an extraordinary treat by drizzling warm dulce de leche over the top. The contrast of temperatures and textures will create a dessert sensation.
The possibilities are as endless as your imagination!
How to Store Dulce de Leche
Short-Term (Room Temp)
- If you’ve just made it and plan to use it within a day or two, you can leave it covered at room temperature—just make sure it’s in a cool spot away from direct sunlight.
Refrigerator:
- Transfer the cooled dulce de leche to a clean, airtight container or glass jar.
Store it in the fridge for up to 10–14 days. - It will firm up significantly—especially if cooked thick. To soften, leave it at room temp for 10–15 minutes or warm gently in a water bath

How to make Dulce de Leche (Fast and Easy)
Ingredients
- 1/2 cup sugar or 100 grams
- 200 ml whipping cream 35% M. F
- 1 can condensed milk 300 ml
Instructions
- Before starting, warm the whipping cream slightly so it isn’t ice cold. Microwave it for 30 seconds to 1 minute until just warm (not hot). This helps prevent the caramelized sugar from hardening when the cream is added and allows it to blend more smoothly.200 ml whipping cream
- Start by adding the sugar to a medium sized pot over medium heat. There's no need to stir initially. Just patiently allow the sugar to melt.1/2 cup sugar
- Once at least half of the sugar has melted, start slowly stirring it. It should take about 5 minutes for the sugar to completely dissolve, becoming entirely transparent or translucent and taking on a light amber/caramel color.
- Once it reaches this point, very slowly introduce a couple of drops of whipping cream to the pot while continuously stirring. Drip a little more and stir again. Continue this process until all the whipping cream is added. Expect a sizzling and bubbling reaction when the whipping cream is added – completely normal.200 ml whipping cream
- After the whipping cream has been completely incorporated, gradually add the condensed milk to the mixture while maintaining a constant stir.1 can condensed milk
- Keep stirring the mixture without a pause. It will start to bubble, foam, and rise a bit. Keep stirring. As you continue, you'll notice the mixture thickening slightly. You'll know it's time to stop when the bubbles have subsided, are bubbling less aggressively, and when you move your spoon through it, a distinct path briefly reveals the bottom of the pan. This is the cue to remove it from the stovetop.
- Transfer the pot to a small bowl and place it in your fridge. Cover it after it cools down.
Notes
- Warm the cream first: Take the whipping cream out of the fridge and warm it in the microwave for 30–60 seconds so it isn’t ice-cold. This helps prevent the caramel from hardening when the cream is added.
- Don’t over-darken the sugar: Once the sugar turns light amber, move to the next step. The dulce de leche will darken naturally as it cooks, and starting too dark can lead to a burnt flavor.
- Add the cream slowly: Pour the cream in gradually while stirring constantly. Adding it too quickly can cause the caramel to seize and form hard sugar clumps.
- Remove before it’s fully thick: Dulce de leche thickens as it cools. Take it off the heat slightly before it reaches your ideal consistency to keep it smooth and spreadable.
- Adjust thickness if needed: For thicker dulce de leche, cook slightly longer. Watch closely—this recipe thickens quickly and small timing changes affect the final texture.
Nutrition
FAQs:
Absolutely! Feel free to get creative. Adding a splash of vanilla extract, a pinch of salt or a pinch of your favorite spice can add a unique twist to your dulce de leche.
If you’ve just made it and plan to use it within a day, you can leave it covered at room temperature. You can also store your dulce de leche in an airtight container in your refrigerator. It should last for at least a 10-14 days. If you have the habit of canning preserves etc, dulce de leche can last month if canned using mason jars. Just make sure you know what you are doing.
Absolutely! It works wonders as a cake filling, drizzle it over ice cream, or incorporate it into various desserts for an extra layer of sweetness. The great thing about this recipe is that you’re in complete control of its texture. Need it firmer? Cook it a little longer. Want it less firm? Just ease up on the cooking time.
I think this is the best method for making dulce de leche as it provides great results in very little time. But it all depends. I like making it like my grandmother used to for nostalgic reasons, but I just do not have the time anymore. I usually have a harder time with the method that requires you to boil the cans. You can’t really see what is happening inside the cans, so I have a harder time cooking it to my preferred texture. Also, there is always a little bit of glue residue left behind in the pan that is annoying to clean, plus I am not sure if chemicals won’t leach out into my food that way.
So what did you think of this great recipe for super fast and easy dulce de leche? I think this is the easiest way to make your very own homemade dulce de leche and it doesn’t require a long time until it is ready. I tried to explain it the best way possible so that you have a foolproof method to make your very own dulce de leche, whether this is your first time making it or you are a seasoned pro. Please let me know if you have any questions and don’t forget to share your dulce de leche adventures with me should you try the recipe. See you next time! 🙂


I made it like this, and it was so good! I don’t make this often but when I do, this is how I’m making it from now on. Thank you so much!
Hi Michelle,
Thank you so much for taking the time to leave such a heartwarming comment on my blog! I’m absolutely thrilled to hear that the recipe worked out well for you and that you will be using it from now on.
Your words of encouragement mean a lot to me, and I’m delighted to hear that you enjoyed it!
Once again, thank you for your kind words and for sharing your experience!
a couple weeks ago i tried several different recipes, including this one, for dulce de leche/caramel sauce. I ha multiple testers and this was the favorite by every person who taste tested. it is delicious! the texture is so perfectly creamy its hard not to eat the entire batch by the spoonful. safe to say i will be using this recipe from here on out. thank you for sharing
Hi Ashley!
Thank you for taking the time to review my recipe! You made my day! I am so glad you enjoyed it! It’s such and easy and practical way to make it. I started making it like this once I found out we are not supposed to be boiling cans to make dulce de leche (ooooops!) and also because I don’t have hours and hours to devote to making dulce de leche the way my grandmother did. Thank you for stopping by, and if you have a chance check some other recipes out! I am sure they will not disappoint 🙂
hello! do you know how much this yields in comparison to the boiling cans of sweetened condensed milk version? I want to use it in a cake recipe that calls for 3 cans total. thank you!
Hi Shannon! Great question. I’ve never actually measured the yield after cooking, but if I had to guess, I would say it makes about 1½ cups. If you double the recipe, you should have enough for yours. (Just keep in mind that’s an educated guess 😉). Next time I make it, I’ll measure properly and update the recipe!
Has anyone tried to make this with coconunt whipped cream for those of us who are dairy intolerant?