
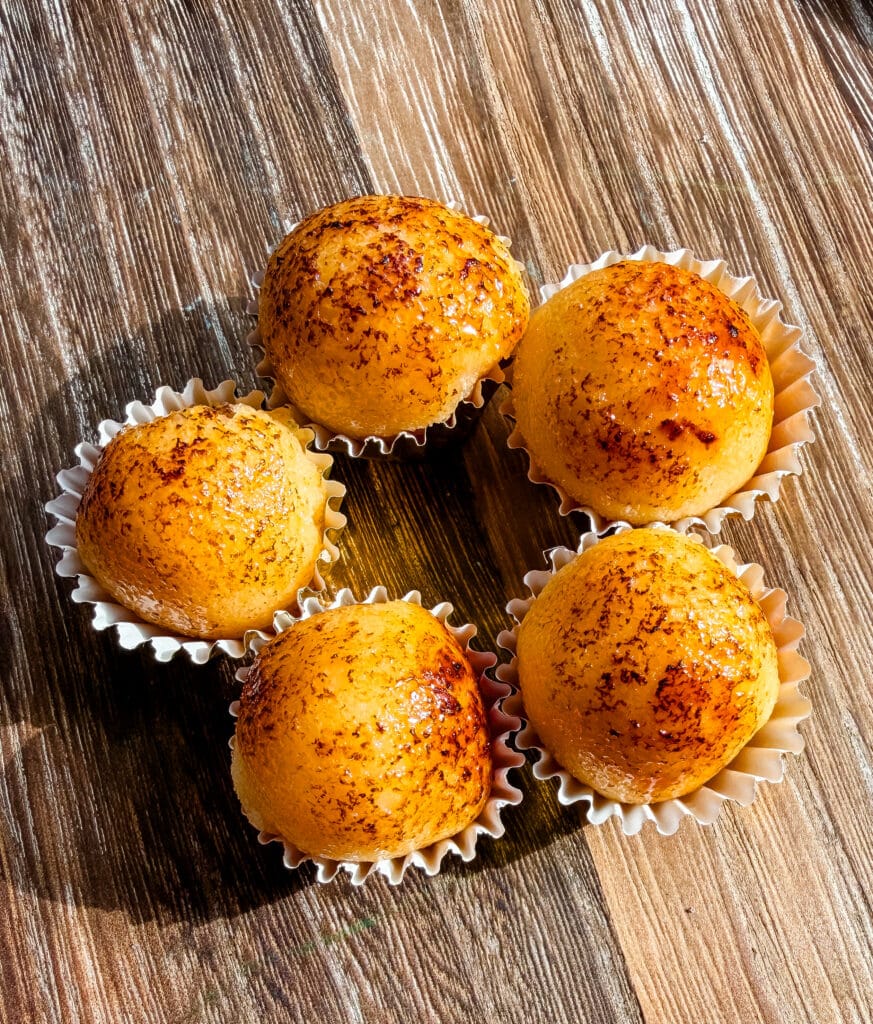
Hey everyone! Today, I’m sharing a truly special recipe for Crème Brûlée Brigadeiros, and it’s not just because they’re incredibly delicious. This recipe comes from my sister-in-law, who has so kindly shared it with me (and now with all of you here on Tasty Recollections). These little bites of creamy vanilla goodness with a caramelized sugar topping feel so fancy but are unbelievably simple to make with just five ingredients.
The first time I made these, my husband declared, “This might be the best dessert you’ve ever made,” and honestly, I think he’s onto something. They’re melt-in-your-mouth smooth, with that classic crème brûlée crunch, and they’re perfect for sharing, gifting, or just treating yourself. Trust me, once you make these, they’ll become your go-to for any occasion!
Check out my Brigadeiro Recipes (Classic, Seasonal & Creative Variations) — I’m building this into a go-to collection with every brigadeiro I’ve shared (and will keep updating it as I post more!).
If there’s a flavor or twist you’d love to see, tell me in the comments 👇 I’m always taking requests!

Oh, and I should also mention that I also have dulce de leche brûlée recipe posted for another creamy, caramelized treat.
Ingredients & Substitutions
- White Chocolate: Use the best quality you can afford. I used Hershey’s white chocolate chips—they’re affordable and do the job, but feel free to use fancier options if you like.
- Condensed Milk: My top pick is Nestlé La Lechera or Moça (the one with the lady on the label), but that can be pricey or hard to find. Eagle Brand is a great alternative! Just avoid super cheap ones—they can taste off.
- Vanilla Extract or Vanilla Bean: Pure vanilla extract or the seeds from half a vanilla bean will give that unmistakable crème brûlée flavor.
- Sugar: Regular granulated sugar works perfectly. Raw sugar with larger crystals also works fine, but skip powdered, or icing sugar—they won’t caramelize properly.
- Egg yolk and Whipping cream: A touch of egg yolk and cream adds extra richness.

Quick How-To
- Combine white chocolate, condensed milk, vanilla, and optional ingredients in a pan. Cook over medium heat, stirring constantly, until the mixture thickens and pulls away from the sides of the pan.
- Let the mixture cool completely, then roll into small balls and coat with sugar.
- Freeze briefly, then torch the tops to caramelize the sugar.
And voilà—fancy, delicious brigadeiros with a caramelized crunch!
How to Serve
Crème Brûlée Brigadeiros are perfect for so many occasions. Serve them on a platter for parties and birthdays, or package them in boxes or jars as gifts. This year, I made a box full of different brigadeiro flavors as holiday gifts for my kids’ teachers, and they were a huge hit! These little treats are thoughtful, homemade, and absolutely irresistible.

Where to Find the Perfect Brigadeiro Liners
In Brazil, traditional paper liners for brigadeiros are as common as rice and beans—you can find them absolutely everywhere. But if you’re outside Brazil, things get a little trickier. Let me save you some frustration: mini cupcake liners won’t work! They’re way too big, and your brigadeiros will look awkward and out of place.
Instead, here’s what to do:
- What to Search For: Use terms like truffle cups, truffle liners, super mini cupcake liners, brigadeiro cups, or brigadeiro liners on Etsy, Amazon, or Brazilian online grocery stores.
- Read Reviews Carefully: You might come across low-star reviews from people complaining the liners are “too small for cupcakes.” Ignore those—those tiny liners are exactly what you’re looking for! Just make sure there aren’t real issues like poor delivery or damaged products.
- For Special Occasions: If you’re planning something extra fancy (like a wedding), Etsy has gorgeous, intricate liners available. But be warned—they can get pricey. Unless you’re hosting an ultra-glam event, simple liners work just as well and are much more budget-friendly.
My Tip:
Since these liners tend to go in and out of stock frequently, I won’t link any specific products. Just bookmark the terms above and hunt around. And remember, it’s all about finding the tiny ones—not cupcake-sized liners.

How to Store
- Shaped and Untorched: Store in an airtight container for up to 10 days in the fridge or freeze for up to 90 days. Roll in sugar and torch just before serving for the best results.
- Rolled and Torched: Keep in the fridge for up to 5 days. Before serving, let them come to room temperature for the creamiest, smoothest texture. They do not freeze well after they have been torched.

Common Problems
Cooking brigadeiro to the perfect consistency can be a bit tricky at first, but here’s what to watch out for:
- Overcooked Brigadeiro: If cooked too long, they’ll become hard and may crystallize, making it tough to stick sugar or sprinkles. Unfortunately, overcooked brigadeiro is hard to fix, so it’s best to start over.
- Undercooked Brigadeiro: If it’s too soft, shaping them into balls will be difficult. They might lose their shape and look melted. If this happens, pop the mixture in the freezer for a few minutes—it often helps!
- Perfect Point: To get it just right, cook until the mixture completely pulls away from the bottom of the pan when tilted. You can also test by dragging a spoon through the center—if it creates two halves that take a moment to come back together, it’s ready.

Crème Brûlée Brigadeiros
Equipment
- fine mesh sieve
- Kitchen torch
- Butane Gas
- Heatproof surface (e.g., baking sheet or spoon)
Ingredients
- 1 can of condensed milk 300ml, 395g
- 100 grams of whipping cream
- 60 grams of white chocolate chips
- 2 egg yolks
- 1 tsp vanilla extract or 1/2 vanilla bean pod
- 40 g white granulated sugar or turbinado/demerara sugar
- butter to grease your hands before rolling the brigadeiros
Instructions
- In a saucepan, add the condensed milk, whipping cream, white chocolate chips, eggs yolks and vanilla extract1 can of condensed milk, 100 grams of whipping cream, 60 grams of white chocolate chips, 2 egg yolks, 1 tsp vanilla extract or 1/2 vanilla bean pod
- Use a fine mesh sieve to separate the egg yolks from the skin. Place the sieve over the saucepan, then gently add the yolks. Let them pass through the sieve into the saucepan—don’t stir back and forth, as that will cause the skin to pass through with the yolks. The skin will remain on the sieve and should be discarded.
- Add the vanilla extract to the saucepan. If you’re using a vanilla bean pod instead, split it in half, scrape out the seeds, and add them to the saucepan.
- Stir the ingredients together until lightly combined.
- Place the saucepan over medium-high heat, stirring constantly until it comes to a boil.
- Once it boils, reduce the heat to medium-low and continue stirring. Cook for about 10-12 minutes, or until the mixture thickens.
- Tip: The right consistency happens when you run a silicone spatula through the brigadeiro and it separates into two halves, slowly coming back together. You’ll also see the bottom of the pan when tilting it, and the brigadeiro will come off the sides and bottom of the pan.
- Turn off the heat and stir for another minute to make the mixture shiny.
- Pour the brigadeiro mixture into a stainless steel or porcelain bowl. Cover with plastic wrap, pressing the wrap directly onto the surface of the brigadeiro to avoid a skin from forming. Let it cool until it’s no longer warm.
- Once cool, divide the brigadeiro mixture into 21g portions for each brigadeiro (about 22 pieces). If you want to be precise, you can use a scale, but I just eyeball mine and don’t worry if they’re not identical in size.
- Lightly butter your hands, roll each brigadeiro into a smooth ball, then transfer to the sugar and coat evenly.40 g white granulated sugar or turbinado/demerara sugar
- Arrange the brigadeiros on a plate or tray with about three finger-widths of space between them.
- Freeze for at least 30 minutes.
- After chilling, use a butane torch (macarico) to lightly caramelize the sugar on each brigadeiro. Important: When using the torch, make sure the brigadeiros are resting on a heatproof surface, like a baking sheet or spoon. Never use the paper liners as they will catch on fire.
- Once the sugar is torched, place each brigadeiro into its paper cup liner, and voila!


This looks so good! What a great combination of flavors!
Thank You Suzanne! It’s definitely one of my favorite brigadeiros. 🙂
Thanks for sharing! Does it keep long?
If store at room temperature it keeps for at least 3 days. if you want them to last longer I recommend storing them in your fridge. The texture changes a bit, but if you leave them out for a bit they will go back to normal. I think they will last for at least 5 days in your fridge. I don’t know if they last much longer because we usually eat them pretty quickly over here 🙂 Hope that helps!
I made the custard and tastes AMAZING. But it was too sticky for me to roll into balls. I’m thinking I needed to cook just a bit longer? Or do I drop a dallop in sugar first then roll?
Greasing your hands with butter helps prevent the brigadeiros from sticking while you roll them. If the mixture is still too soft to shape—even after greasing your hands—it likely needs to be cooked a bit longer. The longer it cooks, the firmer it becomes, so keep a close eye on it to avoid overcooking. If they do turn out too soft, you can place the mixture in the fridge for a while to help it firm up. It’s not ideal, but it definitely helps. I’m so glad you enjoyed the taste!