
Hi everyone! I’ve got a bright and beautiful recipe to share with you today—Fluffy Beet Bread! 🌈 If you loved my Light as Air Pumpkin Bread, get ready to fall for this one too. I know beet bread might sound a little out there, but hear me out—even if beets aren’t your thing, this loaf doesn’t taste like them. It just tastes like soft, pillowy homemade bread… with a fun pop of color!

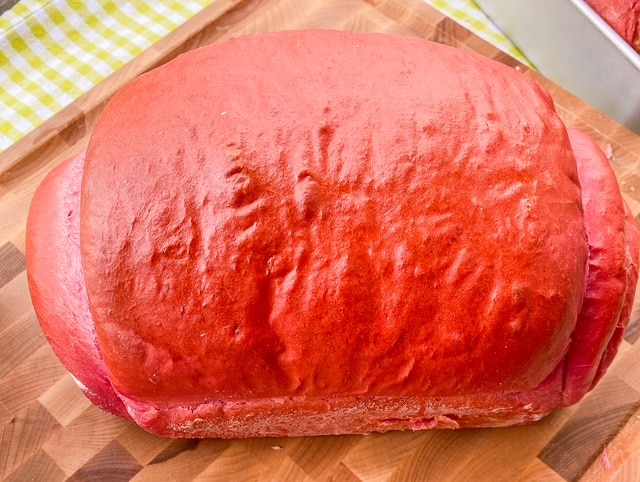
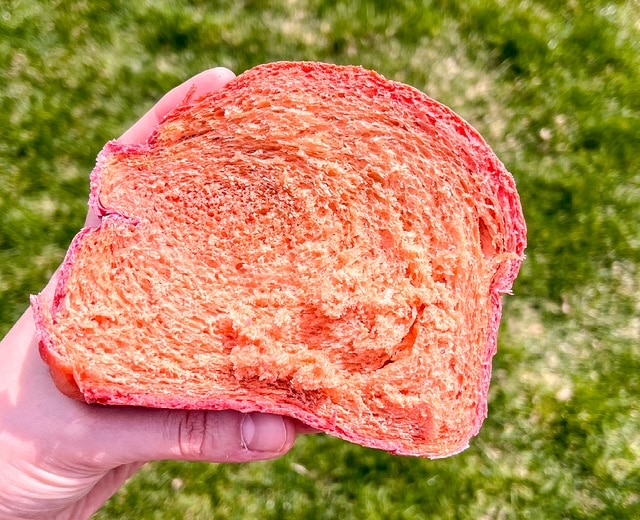
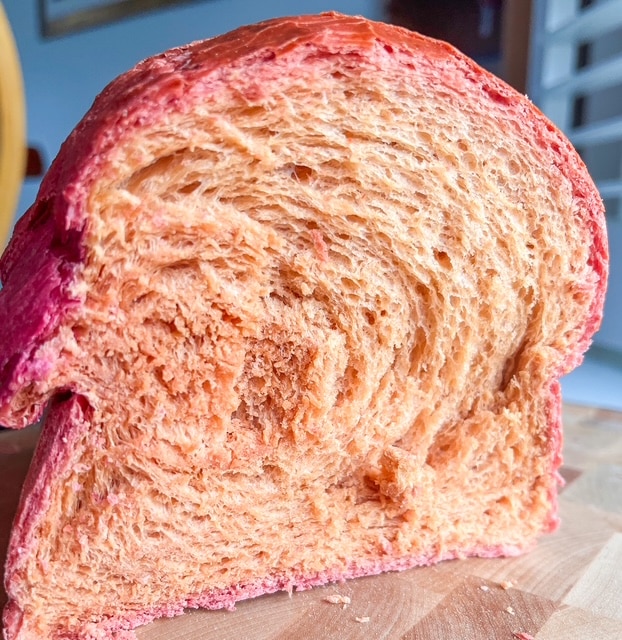
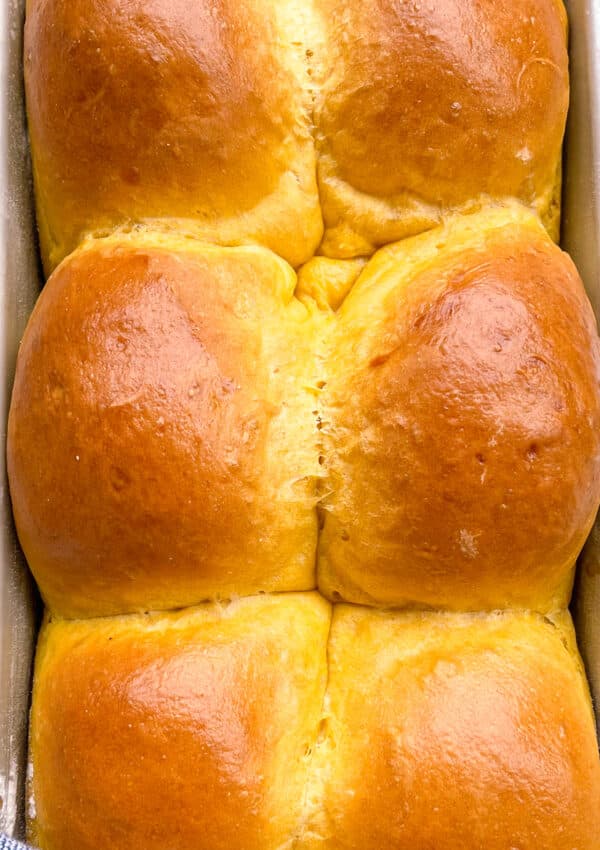
What’s really striking is the color. After baking, the bread gets this beautiful pink crust, and when you slice into it, the inside turns out a softer, more peachy-pink hue. The first time I made it, my kids were fascinated by how pretty it looked—and I was quietly celebrating the fact that they were getting some extra veggies without even noticing. Gotta love a mom win like that. 😉
Why You’ll Love This Recipe:
- Stunning Pink Hue: Naturally colored from beet purée—no artificial colors here!
- Soft & Fluffy: The texture is just like your favorite homemade bread.
- Versatile: Can be shaped as dinner rolls or larger loaves. Great for sandwiches, toasts, or even as a side with dinner.
Does this Fluffy Beet Bread taste like Beets?
Even if you’re not a beet fan, you can still enjoy this bread. It tastes like classic, light, and fluffy bread—because, well, it is bread! The beets add a unique and vibrant touch, giving the outside a striking pink hue and the inside a lovely peachy color.
For the best color, brush the loaves with egg whites only, as specified in the recipe. Traditional egg washes with yolks can make the bread’s crust more golden, which can dull the vibrant pink color. Also, ensure your oven isn’t too hot, as excessive heat might affect the bread’s color. Enjoy the beautiful, colorful twist on a classic favorite!
Ingredients:
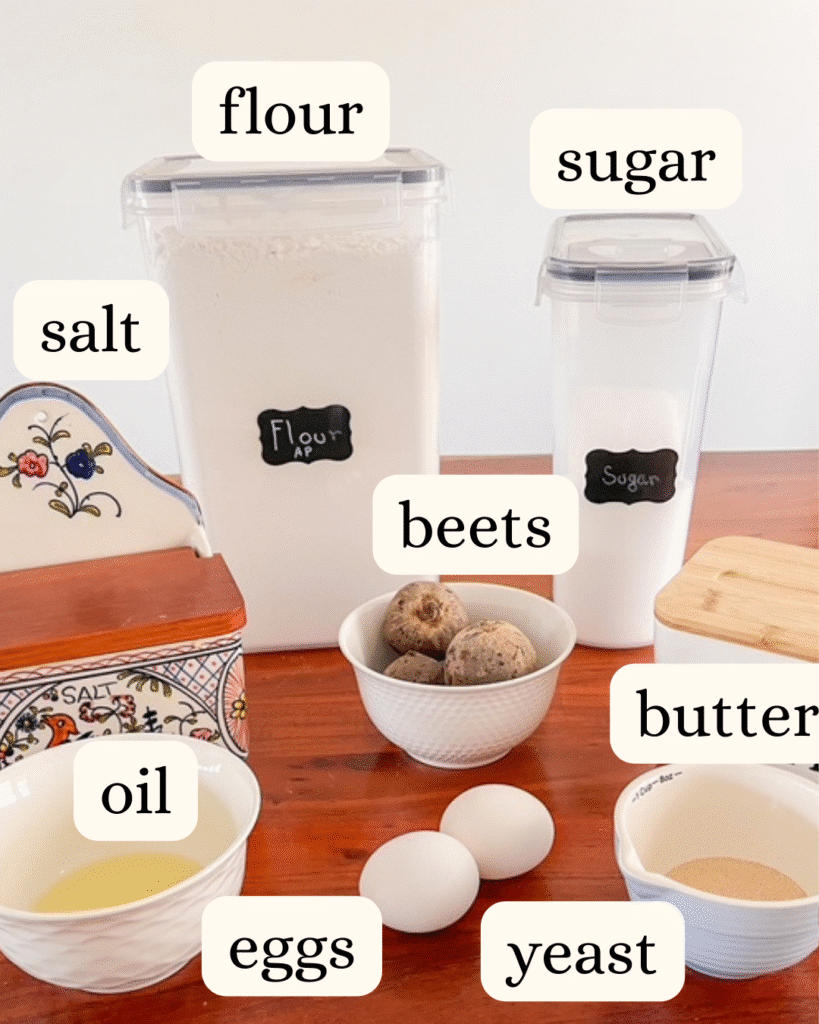
- Large Beets: Peel the beets and boil until tender, then blend into a smooth puree. Fresh beets give the bread its vibrant color.
- Water from Cooking the Beets: Save the water used to cook the beets. This will be used when you blend the beets.
- Large Eggs: Add richness and help bind the dough.
- Oil: Vegetable or canola oil works well, but olive oil is a good alternative.
- Sugar: This helps activate the yeast. I use regular granulated white sugar.
- Butter: You can use either salted or unsalted butter.
- Active Dry Yeast: Essential for making the bread rise and become fluffy.
- All-Purpose Flour: I haven’t tried this with a mix of whole wheat flour and white flour. Using whole wheat flour could make the loaf denser.
- Salt: As always, salt is to taste. Different salt brands have varying degrees of “saltiness.” I provide the amount I use at home as guidance, but adjust according to the type of salt you have as well as your personal preference.
How to Make Fluffy Beet Bread

- Blend the beet puree with the reserved cooking water, then mix it with eggs, oil, sugar, and butter. Add yeast and let it sit for 15 minutes until foamy. Add the salt and gradually incorporate the flour, checking for stickiness and stopping when the dough is no longer sticky. Knead the dough for 15 minutes, then let it rest for 2 hours or until doubled in size

2. Divide the dough into two parts, roll each into a rectangle. Then roll each rectangle into a log, and let them rise again for 30 minutes in a greased pan. Bake at 350°F (175°C) for 35-40 minutes, or until golden brown and the internal temperature reaches 190°F (88°C).
How to Serve:
This bread is not only stunning, but it’s also versatile! Here are some serving ideas:
- As a Sandwich Base: Deli meats, cheese or a layer of hummus.
- With Butter & Jam: Toasted, spread with butter or your favorite jam—it’s a fun way to start your morning!
- Side for Dinner: Serve it alongside soups or stews to soak up all the delicious flavors. You can even shape the dough as dinner rolls if you prefer that to the loaf shape.
How to Store:
At home, we store our bread at room temperature in a large, airtight container, and it usually stays fresh for four days, sometimes longer. Since this is homemade bread, it can start to get a bit stale after that. If your house is especially warm, you might want to store it in the fridge to prevent it from spoiling.
Note: Bread can get moldy if the environment is too hot and humid, so be sure to check for that if yours has been sitting around for a couple of days.
My best tips:
- Beet Size: Beets come in various sizes, but this recipe is flexible. Whether your beets are slightly smaller or larger, it usually won’t affect the outcome significantly. For reference, my beets weighed 230g in total after being chopped and cooked. This should help guide you if you’re unsure.
- Temperature Matters: Make sure your beet mixture (beets and cooking water) has cooled to a lukewarm temperature before adding the yeast. If the mixture is too hot, it may kill the yeast, preventing the dough from rising.
- Flour Amount: Don’t be tempted to add too much flour! Too much flour will result in a dense loaf. In total, I used 1.3 kg of flour. Here’s how: I added 1 kg initially, and when the dough began to get sticky during kneading, I sprinkled in just enough to stop the stickiness, totaling 1.3 kg. The goal is to add as little flour as possible for the dough to no longer stick to your hands. Trust the dough—if you need slightly more or less flour, that’s fine!
- Rising Time: Rising times may vary depending on the temperature of your kitchen. Find the warmest spot in your kitchen and keep the dough away from drafts. In winter, it may take longer for the dough to rise, so be patient, but don’t overproof. Once the dough has doubled in size, it’s ready.
- Cooling the Bread: It’s best to let your bread cool completely before slicing. The bread will continue to cook as it cools, which prevents a gummy crumb. Waiting ensures the perfect texture!
FAQ:
How do I know if I’ve added enough flour?
Great question! In this recipe, you should never add all the flour at once. Add it gradually, mixing in between each addition. Check with your hands—if the dough is still sticking, keep adding flour in small amounts until it stops sticking. The goal is to add as little flour as possible while ensuring the dough isn’t sticky. Adding too much flour will result in a dense loaf, so go slow!
Inspired By:
I discovered this fabulous beet bread recipe from Brazilian chef Marly Mazza’s Instagram account @chefmarly_mazzaemcasa, and I couldn’t wait to try it! If you’re looking for creative and delicious recipes definitely check out her page.
If you like this recipe please don’t forget to leave a review and a comment, and follow tasty recollections in Instagram. See you there and until next time,
Claudia

Fluffy Beet Bread
Equipment
- Rolling Pin
- use one 9×13 baking pan to make one loaf or use 3 loaf pans and make three loaves
- Pastry Brush
- blender
Ingredients
- 2 beetroots approximately 250g
- 400 ml of water ( set aside from boiling the beets)
- 2 eggs
- 30 ml of oil 2 tablespoons
- 2 tablespoons of sugar
- 2 tablespoons of butter
- 20 g of fresh yeast 2 tablespoons
- 1.3 kg of flour add flour gradually, you might might need less, see notes
- Salt to taste I used one tablespoon of salt
Egg Wash
- 1 egg white
Instructions
Cook the Beets:
- Wash, peel and chop the beetroots into small pieces.2 beetroots
- In a medium saucepan, add the chopped beets and enough water to cover them. Bring to a boil and cook for about 20-25 minutes, or until the beets are tender and can be easily pierced with a fork.
- Drain the beets, but reserve the cooking water. Measure 400 ml of the beet water and set it aside to cool slightly, along with the beets.400 ml of water
Blend the Beets
- Once the beets have cooled slightly, blend them with the reserved 400 ml of beet cooking water until smooth. Ensure there are no chunks, as this mixture will give your bread its vibrant pink color.
Prepare the Sponge:
- In a large bowl, combine the blended beet mixture, eggs, oil, sugar, melted butter, and yeast. Mix thoroughly until everything is well incorporated.2 eggs, 30 ml of oil, 2 tablespoons of sugar, 2 tablespoons of butter, 20 g of fresh yeast
- Cover the bowl with plastic wrap and let the mixture rest for about 15 minutes, or until it begins to foam and forms a spongy texture.
Form the Dough:
- Once the sponge is ready, add the salt and gradually begin adding the flour to the beet mixture.1.3 kg of flour, Salt to taste
- Add the flour slowly, mixing as you go. Stop adding when the dough is soft, smooth, and no longer sticks to your hands. (You may not need all the flour, so add just enough for the right consistency. Stop adding flour when the dough no longer sticks to your hands)
- Transfer the dough to a lightly floured surface and knead by hand for about 10-15 minutes, or until the dough becomes smooth and elastic. (If while kneading the dough, the dough starts to get a little sticky again, just add an extra sprinkle of flour)
First Rise:
- Place the dough in a large bowl, cover with plastic wrap or a towel, and let it rise for 2 hours, or until doubled in size.
Shape the Loaves:
- Punch down the dough to release the air, then divide it into two equal portions.
- Using a rolling pin, roll each part into a rectangle, then roll them up into loaf shapes. Place the shaped loaves into a greased 9×13-inch baking pan, leaving some space between them. Cover them again with plastic wrap and let them rise for another 30 minutes, or until doubled in size.
Second Rise:
- Cover the loaves with plastic wrap and let them rise again for about 30-40 minutes, or until they double in size.
Brush with Egg White:
- In a small bowl, lightly beat 1 egg white.1 egg white
- Using a pastry brush, gently brush the tops of the loaves with the egg white to give them a shiny finish when baked.
Bake the Bread:
- Preheat your oven to 180°C (350°F).
- Bake the loaves for 35-40 minutes, or until they are golden brown on top and sound hollow when tapped on the bottom.
Cool and Serve:
- Let the loaves cool in the pans for 10 minutes, then transfer to a wire rack to cool completely before slicing.
Notes
- Beet Size: Beets can really vary in size, but the good news is this recipe is pretty forgiving. Whether your beets are a bit smaller or larger won’t make a huge difference in how the bread turns out. For reference, mine weighed about 230g after being peeled, chopped, and cooked. I’ve tested this with anywhere from 200g to 350g of beets, and it worked beautifully every time. That said, the more beets you use, the more pronounced their flavor will be—so if you’re not a big beet fan, you might want to stick closer to the lower end of that range.
- Temperature Matters: Make sure your beet mixture (beets and cooking water) has cooled to a lukewarm temperature before adding the yeast. If the mixture is too hot, it may kill the yeast, preventing the dough from rising.
- Salt Amount: Saltiness can vary depending on the brand or type of salt you’re using. I used 1 tablespoon in this recipe, but you may find you need a bit less depending on your preference or the salt you’re using.
- Flour Amount: Don’t be tempted to add too much flour! Too much flour will result in a dense loaf. In total, I used 1.2 kg of flour. Here’s how: I added 1 kg initially, and when the dough began to get sticky during kneading, I sprinkled in just enough to stop the stickiness, totaling 1.2 kg. The goal is to add as little flour as possible for the dough to no longer stick to your hands. Trust the dough—if you need slightly more or less flour, that’s fine!
- Rising Time: Rising times may vary depending on the temperature of your kitchen. Find the warmest spot in your kitchen and keep the dough away from drafts. In winter, it may take longer for the dough to rise, so be patient, but don’t overproof. Once the dough has doubled in size, it’s ready.
- Baking Pan Options: This recipe can also be divided into three loaf pans if you prefer smaller loaves. Just split the dough into three equal parts before shaping. Baking time may be slightly shorter, so keep an eye on them near the end.
- Cooling the Bread: It’s best to let your bread cool completely before slicing. The bread will continue to cook as it cools, which prevents a gummy crumb. Waiting ensures the perfect texture!


Leave a Reply