
I can’t count how many times I’ve heard, “When are you going to share your Coxinha recipe?” Well, today’s your lucky day, because I’m finally putting it all down on paper (or, well, screen). If you know, you know: Traditional Coxinha (Brazilian Chicken Croquettes) is the ultimate Brazilian snack, crispy on the outside, soft and savory on the inside, and filled with memories of family gatherings and happy moments. (FYI: This is the same recipe as always, I know its a readers favorite so I have included some more pictures)

But if you’ve never had one, let me set the scene. Imagine biting into a golden, crunchy croquette, shaped like a cute little teardrop and stuffed with flavorful shredded chicken and creamy cheese. You can’t stop at one, trust me. And the best part? Making them at home is a labor of love that’s 100% worth it. Plus, the look on everyone’s face when you serve these warm, homemade Coxinhas—chef’s kiss.

So, roll up your sleeves and let’s get into it. Because once you try making these yourself, you’ll never go back.
What is Coxinha?
Warm, crispy, golden-brown croquette shaped like a little teardrop, stuffed with seasoned shredded chicken and, if you’re lucky, a touch of creamy cheese. It’s the kind of snack that makes you forget everything else for a moment. In Brazil, Coxinha is the go-to treat for parties, family gatherings, or just because you need something amazing to munch on.
The story goes that Coxinha was born in São Paulo, created for a young Brazilian Prince who adored chicken thighs. The name itself, coxinha, literally means “little thigh,” which is why it’s shaped the way it is. But whether or not you buy into the royal origin tale, one thing’s for sure: Coxinha has become a beloved classic, loved by everyone from kids to grandparents.
And here’s the thing—it’s more than just food. It’s that comforting taste that reminds you of home, friends, and all the times you gathered around a plate of freshly fried Coxinhas, trying not to burn your mouth because you just couldn’t wait.

Coxinha Pronunciation
If you’re wondering how to pronounce coxinha, you’re not alone! This popular Brazilian street food is pronounced as koh-SHEEN-yah. The name means “little drumstick” in Portuguese, a nod to its drumstick shape that resembles a chicken leg. Now, when you share these tasty treats with friends and family, you can confidently share their name too!

Looking for more Brazilian Recipes? Here are some of our most popular ones!
Brazilian Chicken Pot Pie-Empadao de Frango: This is like a coxinha but in pie form. A comforting, cheesy classic you’ll want on repeat!
Grandma’s Traditional Brigadeiro Recipe: The sweet treat my grandma was famous for—plus, I’m sharing some family photos!
Best Brazilian Cheese Bread Waffles (Gluten-Free) A reader favorite—crispy, cheesy, and totally addictive.
No-Knead Brazilian French Bread aka Pao Frances!The most missed Brazilian staple for anyone living abroad.
Best Brazilian Cheese Bread: You have to try these—they disappear fast!
Brazilian Flan Recipe (Pudim: My grandma’s favorite dessert—silky, sweet, and irresistible.
Best Brazilian Farofa with Eggs: A childhood favorite that’s still a family staple today.
How to Make Coxinha:
Alright, let’s break down how to make Coxinha at home. It’s not difficult, but it does need some attention to detail. Trust me, once you get the hang of it, you’ll be cranking these out like you were born to do it.
1. Make the Filling
First up is the filling. Everything needs to be finely chopped and shredded. Why? Because there’s nothing worse than biting into a big chunk of onion when you’re expecting a perfectly balanced bite. Plus, those big pieces hog space that could be used for all the good stuff. So, take your time and make sure everything is evenly chopped and well-seasoned. It’s worth it, I promise.
Pro Tip: Season your filling generously. You don’t want bland bites. You’re aiming for a filling so good you’ll have to stop yourself from eating it straight out of the bowl.
2. Make the Dough
Now, onto the dough. There are two authentic routes you can take: with or without potato. Most people wouldn’t even notice the difference, but I’m team potato. Why? It makes the dough softer and creamier on the inside, which is a perfect contrast to the crispy exterior.
3. Putting It All Together
This is where it all comes together. Scoop some filling into the dough and shape it into that iconic teardrop. Don’t stress if your first few look a little wonky—practice makes perfect. For the filling, a little cream cheese works beautifully as a stand-in for traditional Catupiry or requeijão cheese.
Pro Tip: When it’s time to coat your Coxinha, you’ve got options. Egg wash, milk, or even a cornstarch mixture if you’re going for that next-level crunch. I am not a fan of using egg wash. But, check out the recipe notes for all the details and choose your favorite method.
Ingredients and Substitutions
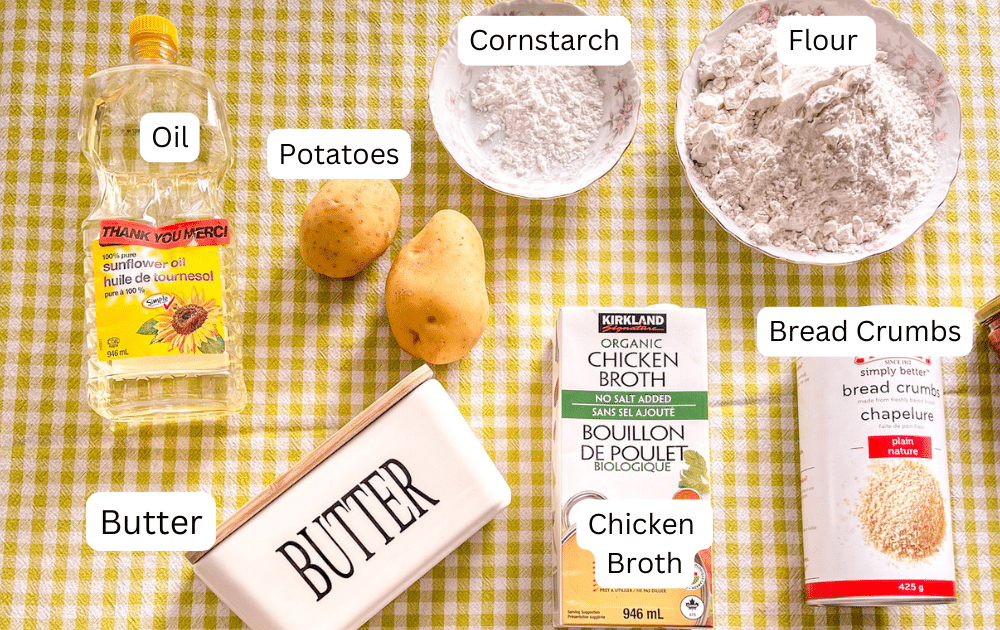
Dough Ingredients:
- Milk: I usually use whole milk or 2% milk.
- Chicken stock/broth: I prefer store-bought, no-salt-added chicken stock. You can also use homemade stock or even water—just remember to adjust the salt if your broth is already salty.
- Butter: Either salted or unsalted works fine. I haven’t noticed a big difference in flavor.
- Potatoes: I typically use white potatoes, but yellow or russet potatoes would also work.
- All-purpose flour: I use regular all-purpose flour and haven’t tested other types yet.
- Salt: Adjust to taste, especially depending on the type of broth or butter you use.
Filling Ingredients:
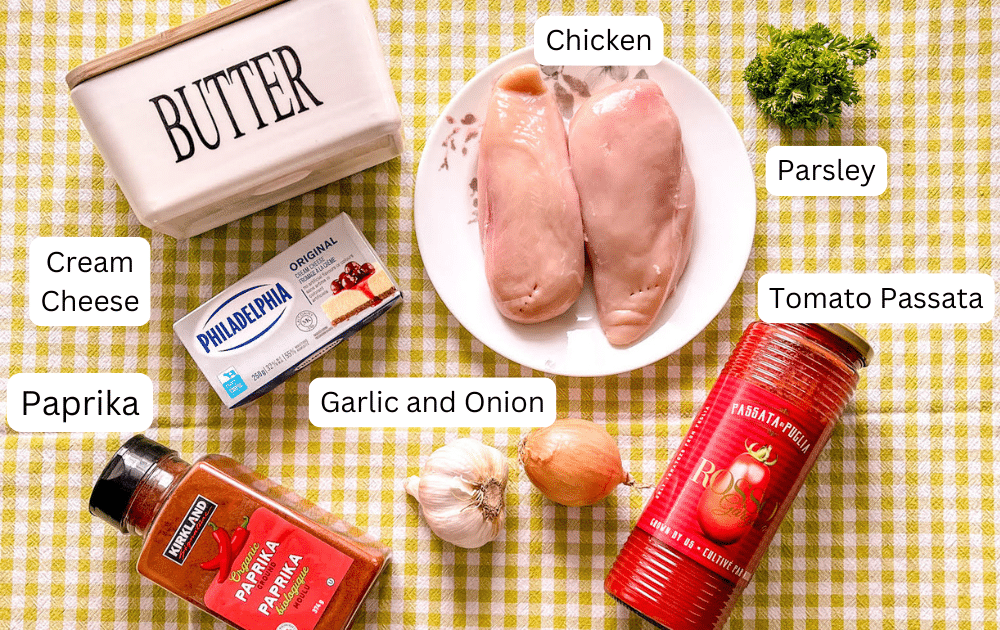
- Boneless, skinless chicken breasts: You’ll need to finely shred them. I like to use my stand mixer with the whisk attachment—it gets the pieces really fine and is much faster than shredding by hand. To do this, transfer the cooked chicken (without the broth) to the mixer bowl while it’s still hot, and let the whisk attachment do the work.
- Butter: Either salted or unsalted butter works fine.
- Garlic and onion: You can finely chop them with a knife, or use a mini food processor for smaller, even pieces—I’ve been preferring that method lately.
- Paprika: Use 1 tablespoon. You can also substitute it with colorau (a typical Brazilian seasoning).
- Cream cheese: Can be substituted with requeijão (a creamy Brazilian cheese).
- Tomato sauce: I use plain, unseasoned tomato passata. You can substitute it with another type of tomato sauce, but it may slightly change the flavor.
- Water
- Salt and black pepper: To taste.
- Chopped parsley or green onions: To taste, for garnish or added freshness.
For Breading & Assembly:
- Milk: 2% or whole milk.
- Cornstarch: Mixed into the milk to create a light coating for breading.
- Breadcrumbs: Use plain, unseasoned breadcrumbs.
- Cream cheese: Use an 8 oz block (you may not need all of it). You can also substitute it with Brazilian cheeses like requeijão or catupiry if available.
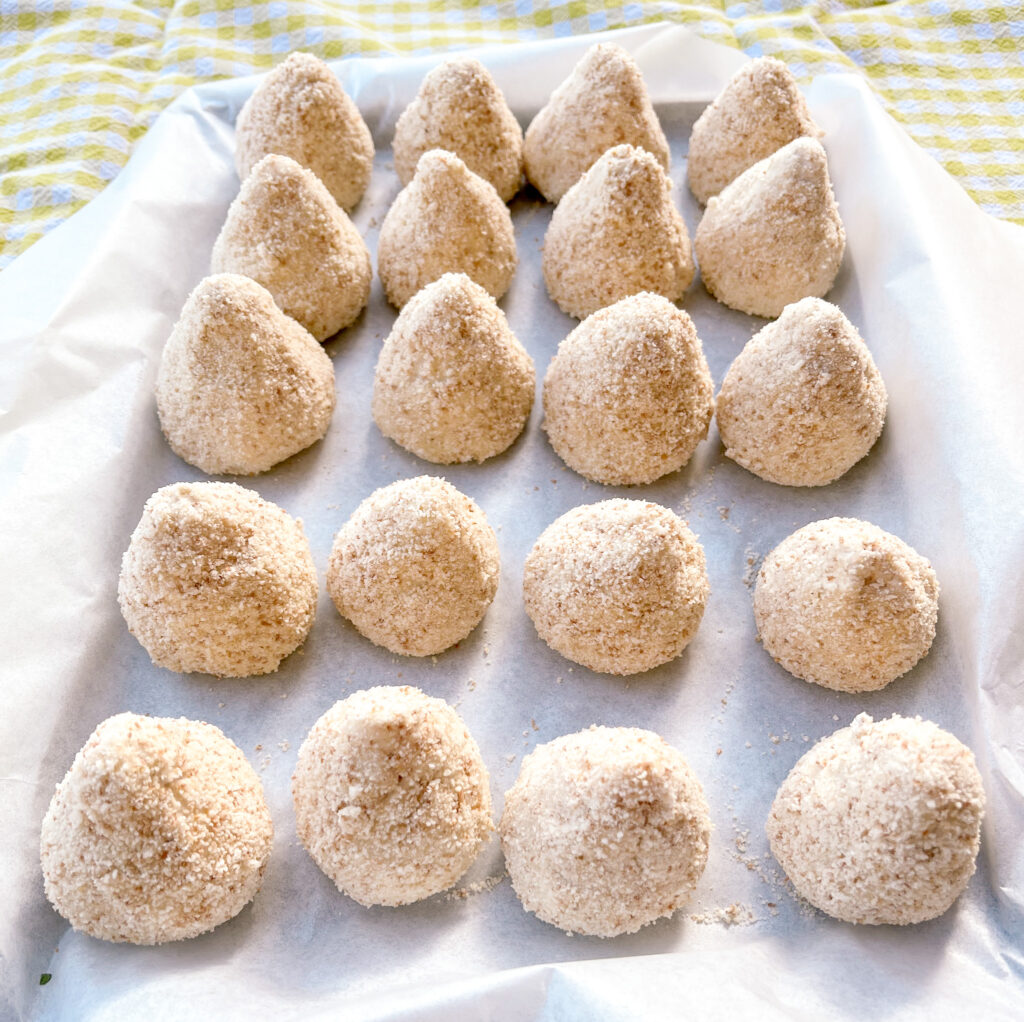
- (Optional) — You don’t have to add cream cheese; you can keep it simple with just the chicken filling. I made two versions—one plain chicken and one with chicken plus cream cheese—and my personal favorite is definitely the chicken + cream cheese version.

Here you can see coxinha with cream cheese + chicken filling on the left side and coxinha with just chicken on the right side.
Instructions:
Coxinha Filling:
- Cook the chicken breast in a pressure cooker with two cups of chicken broth or water for 10 minutes. Naturally release for 5 min. Drain, shred, and set aside. (Set aside the the cooking liquid to use to make the dough later)
- In a pan, heat oil and sauté garlic until golden. Add the onion and cook for 2 minutes. Add the garlic and stir for two more minutes
- Stir in paprika, cream cheese and tomato sauce and shredded chicken, season with salt and pepper, and add parsley.
- Set aside to cool.
Coxinha Dough:
- Peel and quarter the potatoes, then cook until very tender. Mash while still warm and set aside.
- In a large pot, combine the milk, chicken broth, salt, butter, and mashed potatoes. Bring to a boil.
Tip: I like to use the leftover cooking liquid from the chicken (strained through a sieve) and add some more water or broth to complete the 450 ml of broth needed. This gives the dough a richer flavor - Add flour all at once and stir vigorously until the dough pulls away from the sides and forms a ball.
- Transfer the dough to an oiled surface and let it cool slightly. Knead until smooth and cover with plastic wrap to prevent drying.
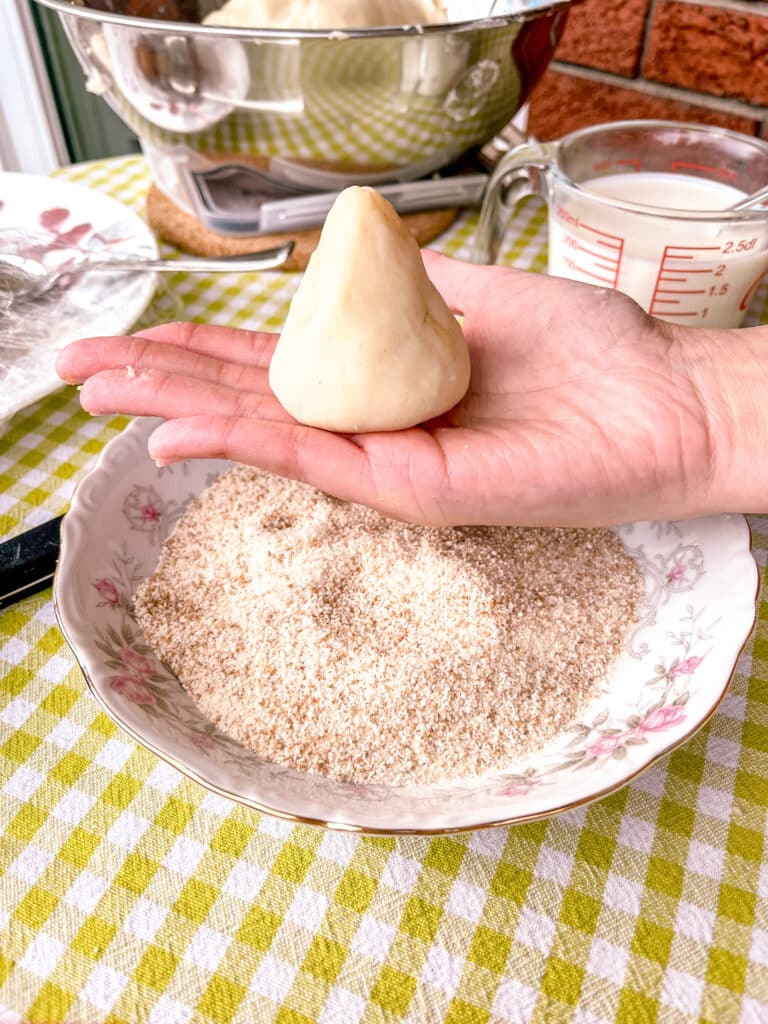
Assembling the Coxinha:
- Take a portion of dough about the size of a golf ball and flatten it in your hand. Make sure to keep the center slightly thicker than the edges. This will help hold the savory chicken filling securely and create the classic tear drop shape when you close i
- Add a dollop of cream cheese and a spoonful of chicken filling. Press down to compact.
- Fold and seal the dough into the teardrop shape.
- Dip in milk and coat with breadcrumbs.
Frying:
- Fry in hot oil until golden brown
- .Frying Tip: When it’s time to fry your coxinhas, make sure to work in small batches. Frying too many at once can lower the oil temperature, resulting in unevenly cooked coxinhas that may not develop that perfect golden, crispy exterior. Keep the oil at medium heat and maintain the right temperature to ensure each batch turns out beautifully golden brown.
- Once your coxinha are fried to a golden brown, set them on paper towels to drain excess oil before serving. This keeps them crisp and removes any excess grease.
- Serve warm—coxinhas are best enjoyed fresh when they’re still crispy on the outside and tender on the inside.

Important Tip: Please remember, never pour hot oil or any used cooking oil down your drain. This can lead to serious plumbing issues and environmental harm.
What to Do Instead:
- Let It Cool: Allow the oil to cool completely after frying.
- Store It: Pour the cooled oil into a sealed, disposable container.
- Dispose Properly: Throw the container in the trash or check if your local recycling center accepts used cooking oil for recycling.
How to Serve
Serve your coxinha warm as an appetizer or snack. They’re perfect for dipping—think tangy BBQ sauce, creamy ranch, or a zesty hot sauce. But honestly, I think they’re just as amazing on their own! In Brazil, coxinhas are a party staple, often seen at birthday celebrations and other special occasions. So go ahead and share them with friends and family or enjoy them on your own (I won’t judge 😉)
How to Store and Freeze
Freezing Coxinha:
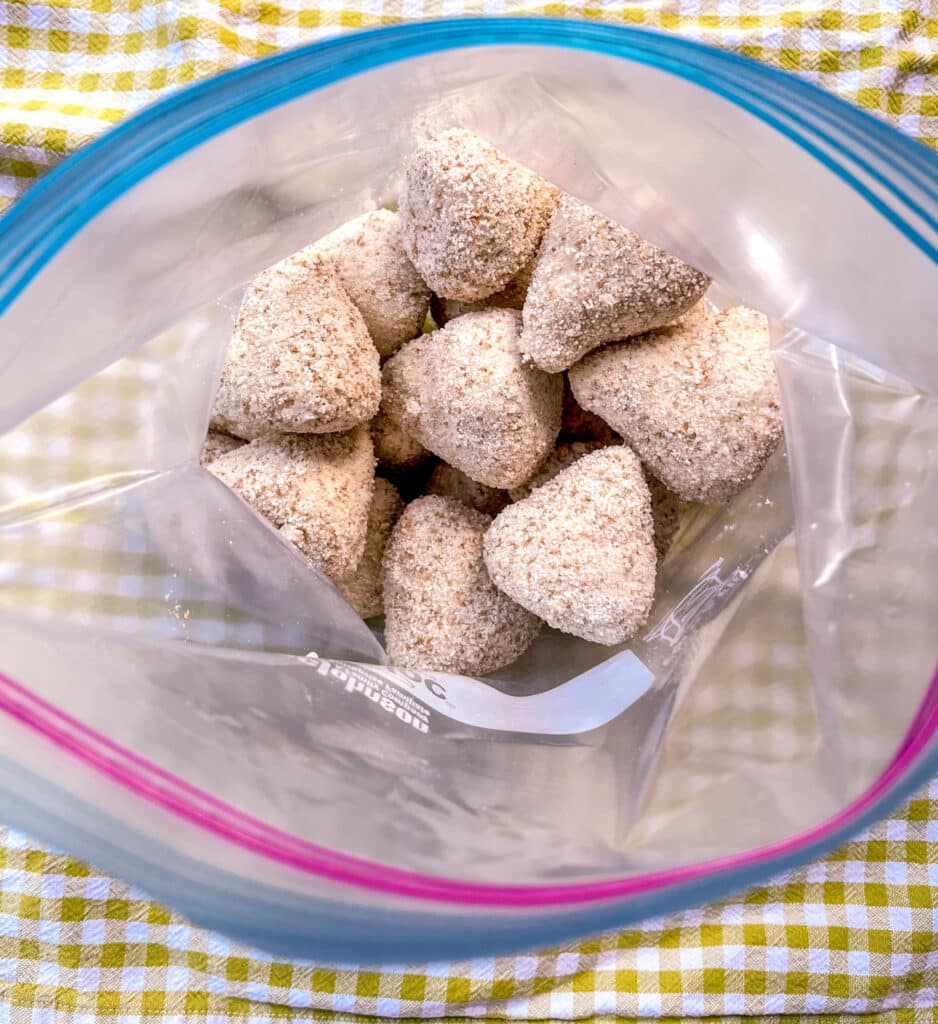
- After shaping and breading your coxinha, arrange them in a single layer on a tray and cover with plastic wrap. Place the tray in the freezer. Once they’re fully frozen, transfer the coxinha into a sealed plastic bag or airtight container. You can store them in the freezer for up to 2 months. This is a great way to prepare them in advance for a party or quick snack.
Frying Frozen Coxinha:
When you’re ready to fry, you can cook them directly from the freezer, but I recommend letting them thaw slightly. Frying them straight from frozen may cause the filling to stay cold while the outside cooks, which isn’t ideal. So, give them a little time to cool down first if you prefer a perfectly warm filling.
Storing Leftovers:
If you have any leftover coxinha (which is rare, right?), store them in an airtight container in the fridge for up to 3 days. To reheat, it’s best to pop them in the oven at 350°F (175°C) for about 10 minutes to get them crispy again. You can also reheat them in the air fryer for 5–6 minutes for that perfect crunch!.


Traditional Coxinhas (Brazilian Chicken Croquettes)
Equipment
- Stand mixer (with whisk attachment) or two forks to shred the chicken
- large pot for frying coxinhas
- Potato ricer for mashing the potatoes smoothly
Ingredients
For the Dough:
- 1 ¾ cups 450 ml milk
- 1 ¾ cups 450 ml chicken broth or water
- 1 tablespoon salt
- 3 ½ tablespoons 50 g butter
- 2 large potatoes peeled and mashed (about 625 g)
- 3 ½ cups 450 g all-purpose flour (sifted) Note: If you’re in Brazil, use about 4 cups or 500 g of flour as it absorbs more liquid
- Note: If you’re in Brazil, use about 4 cups or 500 g of flour as it absorbs more liquid
For the Filling:
- 2 large boneless skinless chicken breasts (about 10.5 oz / 300 g)
- ¼ cup butter 1/2 stick / 2 oz
- 4 cloves garlic minced or grated
- 1 small onion finely chopped or grated
- 1 tablespoon paprika
- 4 tablespoons cream cheese
- 4 tablespoons tomato passata
- salt and black pepper to taste
- chopped parsley to taste
For Assembly, Breading & Frying:
- ½ cup milk
- 1 tablespoon cornstarch
- bread crumbs
- 8 oz cream cheese optional
- vegetable oil for frying
Instructions
Cook the Chicken:
- In a pressure cooker, add enough water or chicken broth to the pot to fully cover the chicken breasts. Cook for 10 minutes.2 large boneless skinless chicken breasts
- Let the pressure release naturally for 5 minutes.
- Shred the chicken once it’s cool enough to handle and set aside. (Save the broth to use for the dough.)
Prepare the Filling:
- In a large skillet, heat the butter over medium heat.¼ cup butter
- Add the onion and cook for 2 min. Add the garlic and cook for 2 more minutes.1 small onion, 4 cloves garlic
- Stir in the paprika, cream cheese, and tomato sauce.1 tablespoon paprika, 4 tablespoons cream cheese, 4 tablespoons tomato passata
- Add the shredded chicken, season with salt and pepper, and mix in the parsley.salt and black pepper, chopped parsley
- Set the filling aside to cool.
Make the Dough:
- Peel and cut the potatoes into chunks. Boil them in water until soft, then drain well. Pass the cooked potatoes through a potato ricer (or mash them until smooth). Set aside.2 large potatoes
- In a large pot, combine the milk, chicken broth, salt, butter, and mashed potatoes.1 ¾ cups 450 ml milk, 1 ¾ cups 450 ml chicken broth or water, 1 tablespoon salt, 3 ½ tablespoons 50 g butter
- Bring the mixture to a boil, stirring occasionally.
- Once boiling, gradually add the sifted flour, stirring constantly until a smooth dough forms.3 ½ cups 450 g all-purpose flour (sifted)
- Cook the dough for 5-7 minutes over medium-low heat, stirring until it pulls away from the sides of the pot and forms a ball.
- Transfer it to a lightly oiled surface. Let the dough cool enough to handle.
- When it cools down enough to handle, knead the dough until it becomes smooth and elastic. Always keep it covered with plastic wrap to prevent it from drying out.
Assemble the Coxinhas:
- Take a piece of dough (about the size of a golf ball) and flatten it in your hand.
- Place the chicken filling in the center, then add a little cream cheese on top if you’re using it.8 oz cream cheese
- Carefully pinch the edges of the dough together, shaping it into a drumstick shape.
- Repeat until all dough and filling are used.
Bread the Coxinhas:
- In a large mug or cup, dissolve the cornstarch in the milk. Stir occasionally while breading, as the mixture may settle on the bottom.½ cup milk, 1 tablespoon cornstarch
- Dip each coxinha in milk and roll them in bread crumbs until evenly coated. Set them aside on a tray lined with parchment paper.bread crumbs
Fry the Coxinhas:
- Heat enough vegetable oil in a deep fryer or large sauce pan over medium heat to cover the coxinhas.vegetable oil
- Fry in small batches, about 4-5 at a time, until golden brown, about 3-4 minutes per side.
- Remove and place on paper towels to drain.
- Serve warm! Coxinhas are best enjoyed fresh.
Notes
Nutrition
FAQs
Yes, thighs will give an even juicier filling.
Use cream cheese and avoid overcooking the chicken to retain moisture.
Yes, you can absolutely make coxinhas ahead of time! Coxinhas are a popular food choice for parties and gatherings, and prepping in advance makes serving them easier. After shaping and breading the “coxinha de frango“, place them on a parchment-lined baking sheet and cover with plastic wrap. Store in the refrigerator for up to one day or freeze for longer storage.
For freezing, arrange the little croquettes in a single layer on a baking sheet until solid, then transfer to an airtight container or plastic wrap for up to 2 months. When ready to serve, let them sit at room temperature for about 15-20 minutes before frying in enough oil at medium heat. This helps ensure they cook evenly and reach the right internal temperature.
Serving freshly fried Brazilian snacks like coxinhas guarantees they’ll be the hit of any celebration!
Next time, if you’re craving a tasty appetizer that everyone will love, you know exactly where to turn. Ready to make your own Brazilian chicken croquettes (aka coxinha de frango)? Give this coxinha recipe a try, and let me know how it goes! Don’t forget to share your photos with me – I’d love to see your creations!


This recipe is simply outstanding! The coxinhas turned out perfectly golden and crispy on the outside, Thank you for sharing !
The dough was soft on the inside, crispy on the outside and flavorful .The chicken filling was just the right mix of creamy and well-seasoned. It says cream cheese is optional but I recommend adding it! It makes it so much better! The detailed notes made the process smooth, even for first-timers.
nice information and good article thank you